Zigbee2MQTT
The Zigbee2MQTT connector brings Zigbee devices managed by Zigbee2MQTT (Z2M) into ThingsPanel. After reading this guide you can install the connector, discover the devices Z2M has paired, bind them in bulk, watch their telemetry and send commands such as on/off and brightness.
The screenshots show the Chinese interface. Menu and button names are given in English with the Chinese label in parentheses. Steps are marked Administrator (platform administrator) or Tenant user.
1. Overview
- Discover: the connector reads Z2M's retained
bridge/deviceslist and shows the paired devices in ThingsPanel for bulk binding. - Report: device state (temperature, humidity, on/off, brightness, …) becomes telemetry. If Z2M availability is on, online/offline is reported too.
- Control: switch and brightness commands, and any writable property the device exposes, are sent to Z2M and confirmed by reading the device state back.
- Devices are identified by their IEEE address, so renaming a device in Z2M does not break its binding.
- Scope: lights (on/off, brightness), plugs and switches, and numeric sensors such as temperature and humidity that Zigbee2MQTT exposes over MQTT.
2. How it works
Zigbee devices ── Zigbee2MQTT ── MQTT broker ◀── Zigbee2MQTT connector ──▶ ThingsPanel
   (radio)        (you run it)    (you run it)    (plugin, run by the platform)
You run Zigbee2MQTT and its MQTT broker. The connector is a plugin that the platform administrator installs; it connects to your Z2M broker using the address you enter in an access point, so no Zigbee2MQTT plugin and no Home Assistant integration is needed.
3. Prerequisites
- A ThingsPanel platform that supports plugin installation, with the Zigbee2MQTT plugin available in its plugin catalog.
- A Zigbee coordinator (USB dongle) attached to the machine that runs Z2M.
- An MQTT broker reachable by both Z2M and the platform's plugin runtime.
- Z2M's Home Assistant integration switched off.
4. Deploy Zigbee2MQTT
The following docker-compose.yml runs Mosquitto and Zigbee2MQTT. Replace the device path with your coordinator's (/dev/ttyUSB0 is only an example).
services:
  mosquitto:
    image: eclipse-mosquitto:2
    restart: unless-stopped
    ports:
      - "1883:1883"
    volumes:
      - ./mosquitto/config:/mosquitto/config
      - ./mosquitto/data:/mosquitto/data

  zigbee2mqtt:
    image: koenkk/zigbee2mqtt
    restart: unless-stopped
    depends_on:
      - mosquitto
    ports:
      - "8080:8080"          # Z2M web UI
    volumes:
      - ./z2m-data:/app/data
    devices:
      - /dev/ttyUSB0:/dev/ttyUSB0
mosquitto/config/mosquitto.conf:
persistence true
persistence_location /mosquitto/data/
listener 1883
allow_anonymous false
password_file /mosquitto/config/passwords
Create the password file with mosquitto_passwd -c mosquitto/config/passwords <user>. Then z2m-data/configuration.yaml:
homeassistant: false
permit_join: false
mqtt:
  base_topic: zigbee2mqtt
  server: mqtt://mosquitto:1883
  user: <mqtt user>
  password: <mqtt password>
serial:
  port: /dev/ttyUSB0
frontend:
  port: 8080
availability: true
Do not add or copy a network_key or pan_id by hand: Z2M generates them on first start. Never publish or share your configuration.yaml, it contains your Zigbee network key.
availability: true lets Z2M report when a device goes offline; without it ThingsPanel only learns that a device is online when it sends data and never marks it offline. Expose the broker only to networks you trust and keep authentication on. Start the stack with docker compose up -d.
5. Install the connector (Administrator)
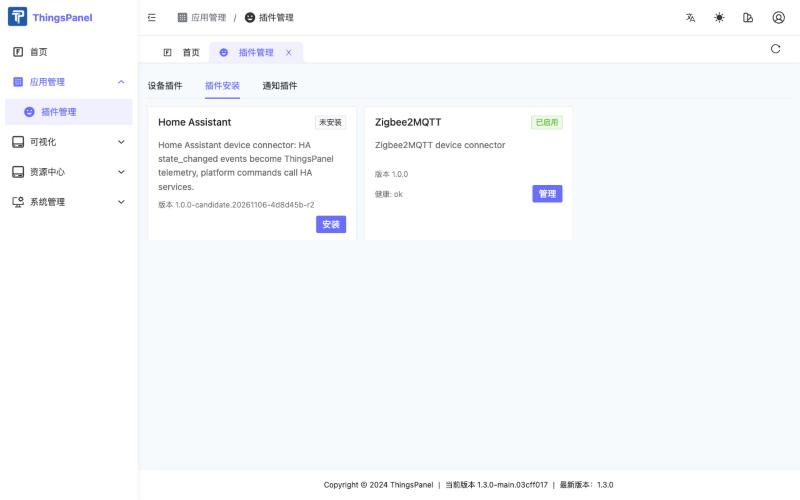
- Open Application Management (应用管理) → Plugin Management (插件管理) and switch to the Plugin Installation (插件安装) tab.
- Find the Zigbee2MQTT card. Once installed, it shows 已启用 (enabled) and
健康: ok(health: ok).
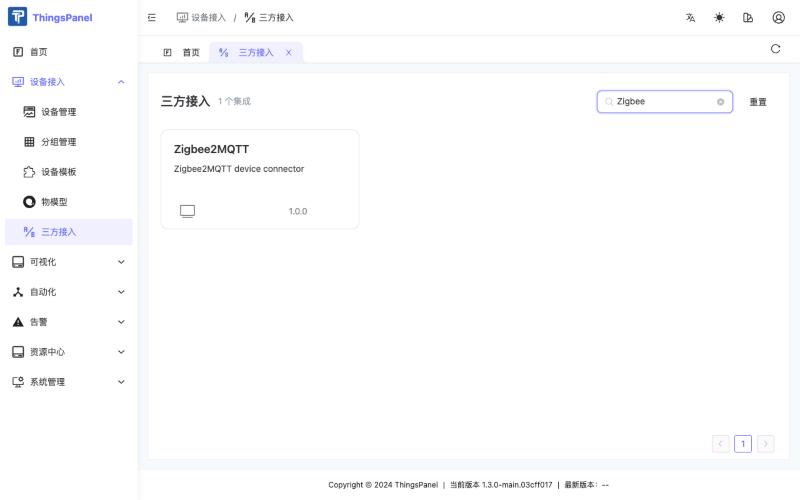
An installed connector appears for tenant users under Device Access (设备接入) → Third-party Access (三方接入) as the Zigbee2MQTT integration.
6. Pair devices in Zigbee2MQTT
Pairing is done in Zigbee2MQTT, not in ThingsPanel:
- Open the Z2M web UI and click Permit join (All), or temporarily set
permit_join: true. - Put the device in pairing mode (usually by pressing its reset button for several seconds).
- Wait until Z2M shows the device as interviewed, then turn permit join off again.
7. Create a thing model and a device template (Tenant user)
Commands come from a published thing model. Telemetry is stored without one, but a thing model gives the values names and units, and the device template links the model to the devices.
7.1 Create the thing model
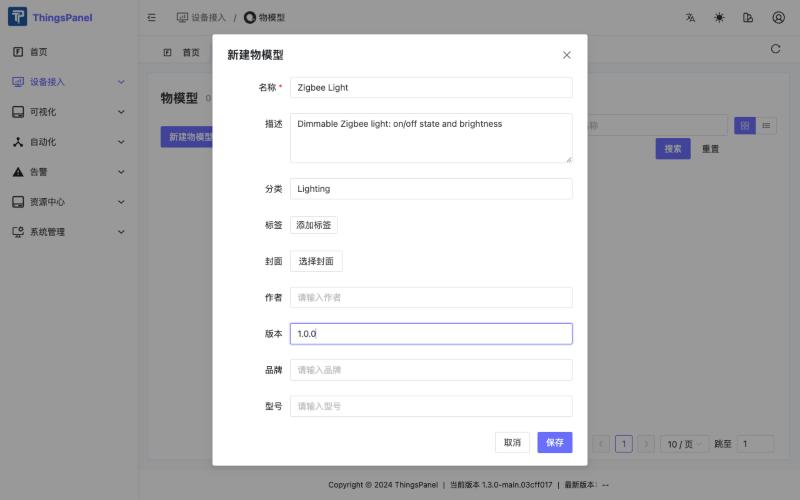
- Open Device Access (设备接入) → Thing Model (物模型) and click New Thing Model (新建物模型). Enter a name, for example
Zigbee Light, and save.
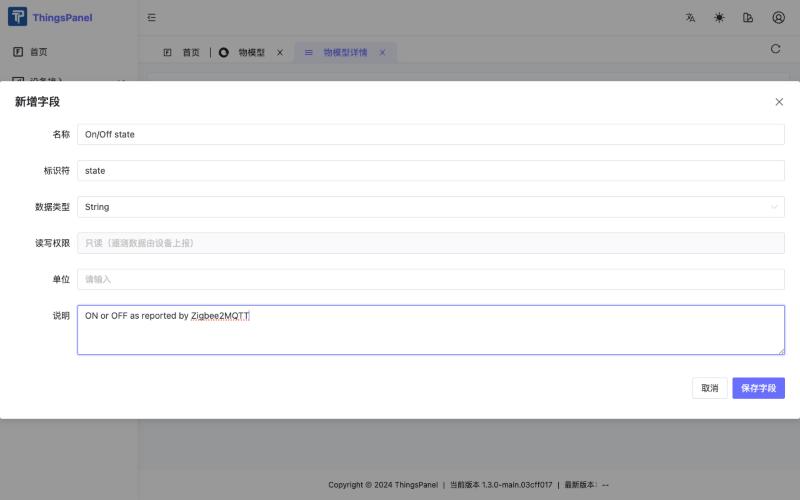
- In Thing Model Definition (物模型定义) → Telemetry (遥测) click Add Telemetry (新增遥测). The identifier must equal the Z2M property name.
- In the Command (命令) tab click Add Command (新增命令) and add one parameter for each command.
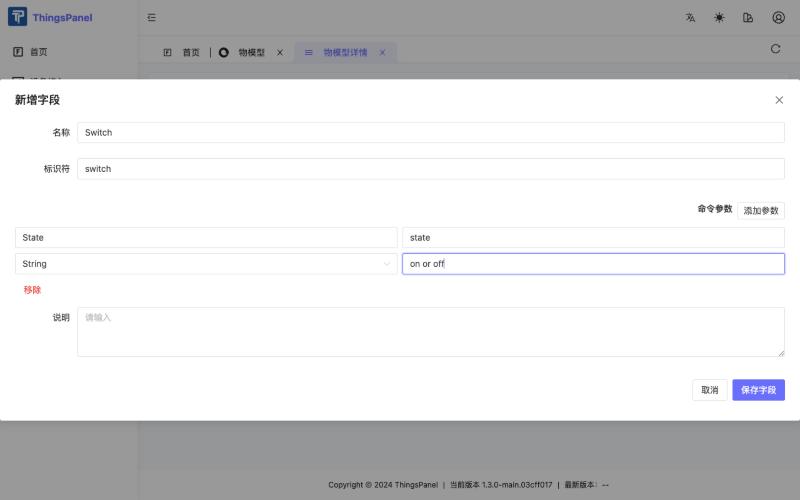
Suggested fields:
| Device | Telemetry identifiers | Command identifier (parameter) |
|---|---|---|
| Light | state (String), brightness (Number, 0–254) | switch (state: on / off), set_brightness (level: 1–100) |
| Temperature/humidity sensor | temperature (Number), humidity (Number) | none |
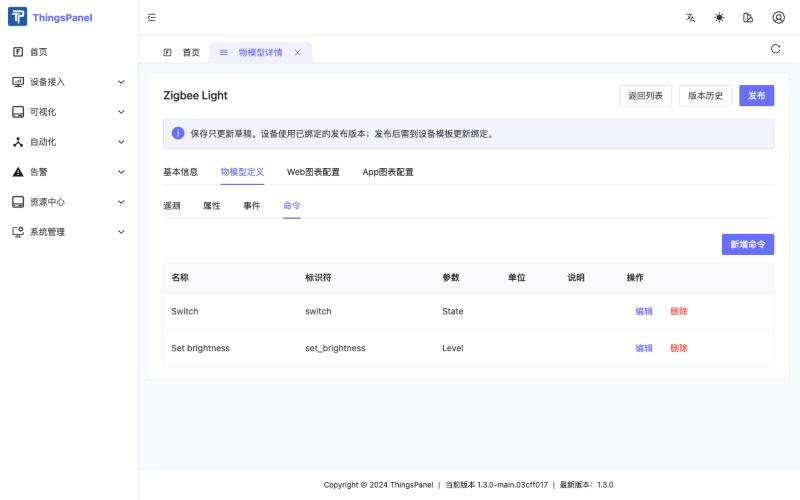
The platform does not accept a command whose identifier equals a telemetry identifier in the same thing model. That is why the brightness command is named set_brightness while the telemetry is brightness. The connector accepts set_<name> for every command name.
- Click Publish (发布), enter a release note and confirm. A thing model can only be used after it is published.
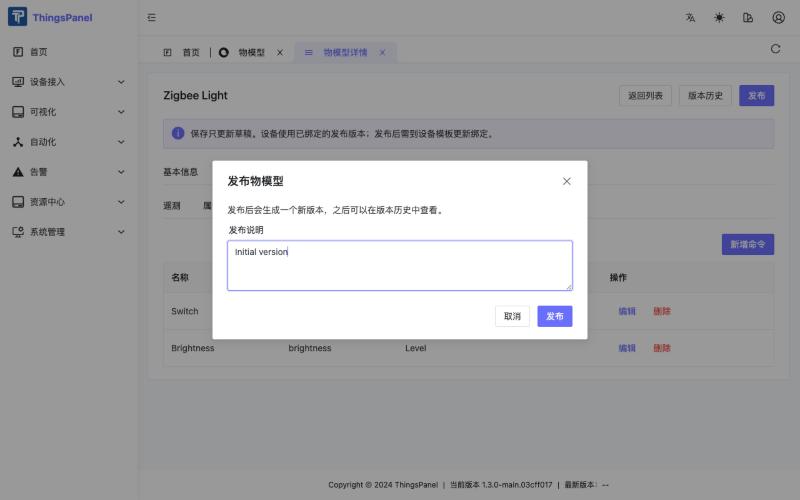
7.2 Create the device template
- Open Device Template (设备模板) and click New Device Template (新建设备模板). Enter a name, choose 直连设备 (direct device) as the access type, and select the Zigbee2MQTT service under 选择协议/服务. Confirm with OK (确定).
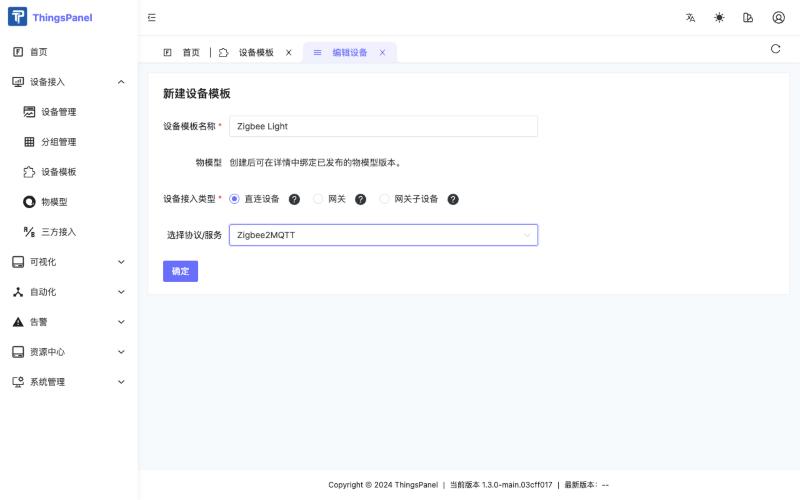
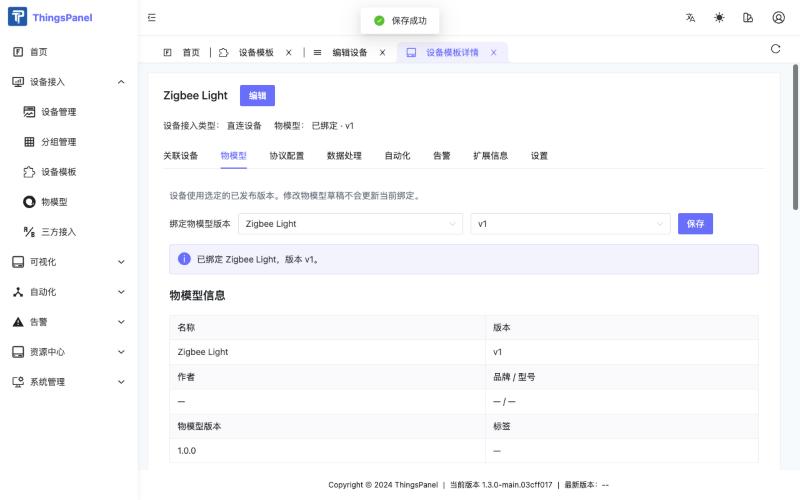
- Open the template, switch to its Thing Model (物模型) tab, choose the published thing model and version, and click Save (保存). When you publish a new version of the thing model, select the new version here again.
8. Create an access point and bind devices (Tenant user)
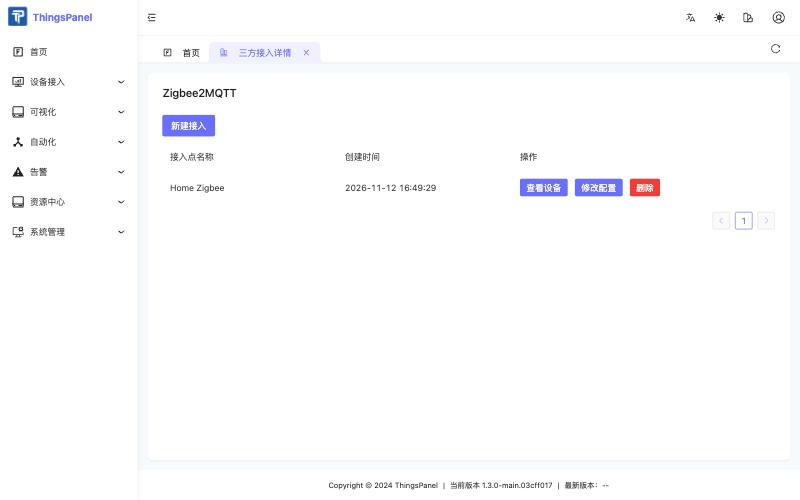
- Open Device Access (设备接入) → Third-party Access (三方接入) → Zigbee2MQTT.
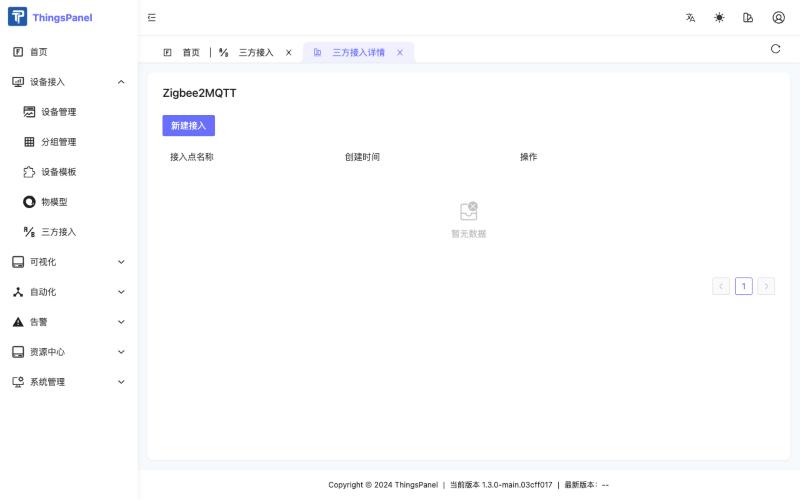
- Click New Access (新建接入) and fill in the form.
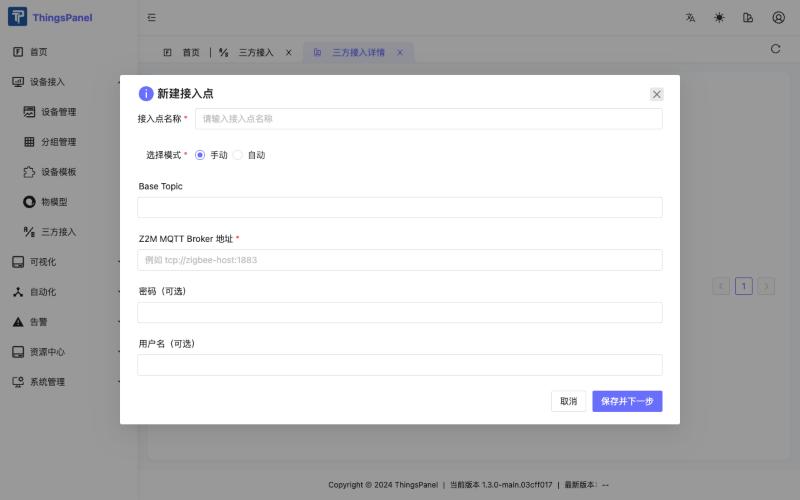
| Field | Description |
|---|---|
| 接入点名称 | Any name |
| 选择模式 | Keep 手动 (manual) |
| Base Topic | Z2M base_topic, default zigbee2mqtt |
| Z2M MQTT Broker 地址 | Broker that Z2M publishes to, for example tcp://<broker-host>:1883; it must be reachable from the platform |
| 用户名 / 密码(可选) | Broker credentials, if required |
Each access point opens its own connection to its Z2M broker; create one access point per Z2M instance.
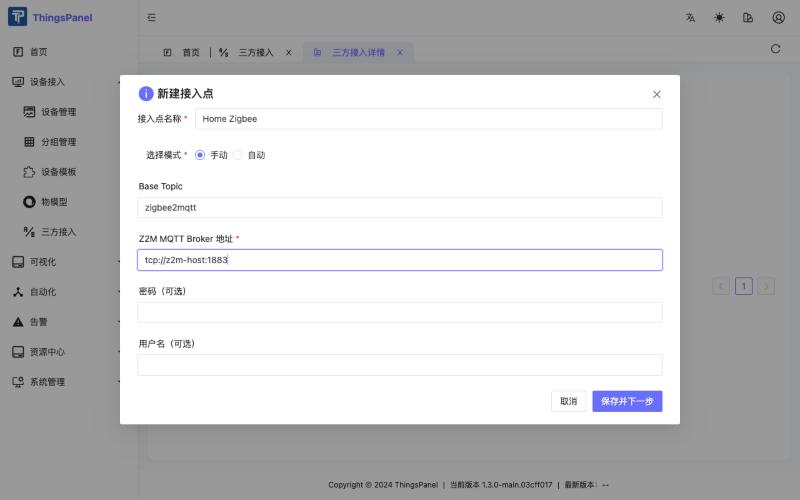
- Click Save and Next (保存并下一步). The connector lists the devices Z2M has paired and interviewed (the coordinator, unsupported and disabled devices are not listed). The next time you open the access point, use Modify Configuration (修改配置) → 保存并下一步 to return to this list.
- Tick the devices you want to bind first, choose the device template for each (the light uses
Zigbee Light), then click Confirm (确认). Without ticking a device, nothing is bound.
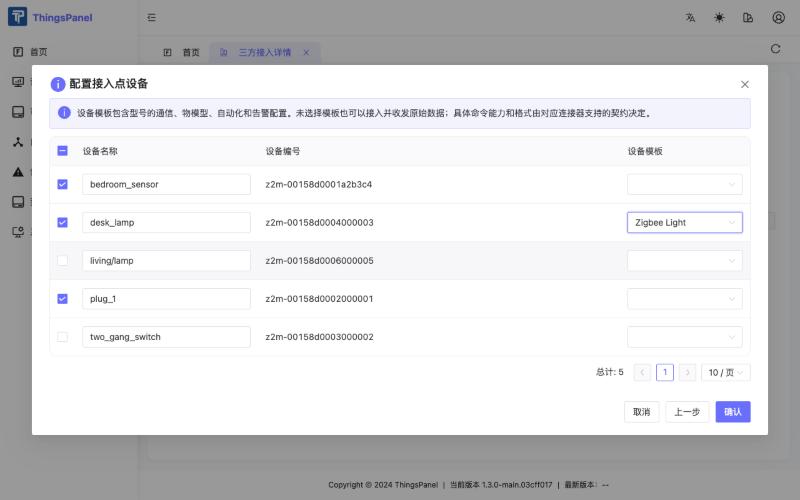
A device bound without a template still reports raw data, but commands need a template with a published thing model.
9. Monitor and control (Tenant user)
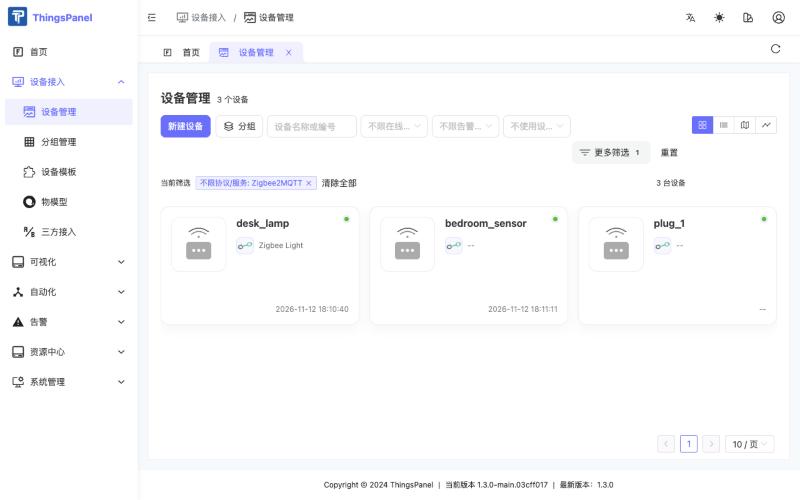
- Open Device Access (设备接入) → Device Management (设备管理). The connector picks up new bindings within about 30 seconds; devices usually turn online (green dot) within about a minute and can take up to two minutes.
- Open a device and stay on the Telemetry (遥测) tab. Values are named after the thing model; keys that are not in the model are shown as "绑定版本未定义" (not defined in the bound version), for example
linkquality.
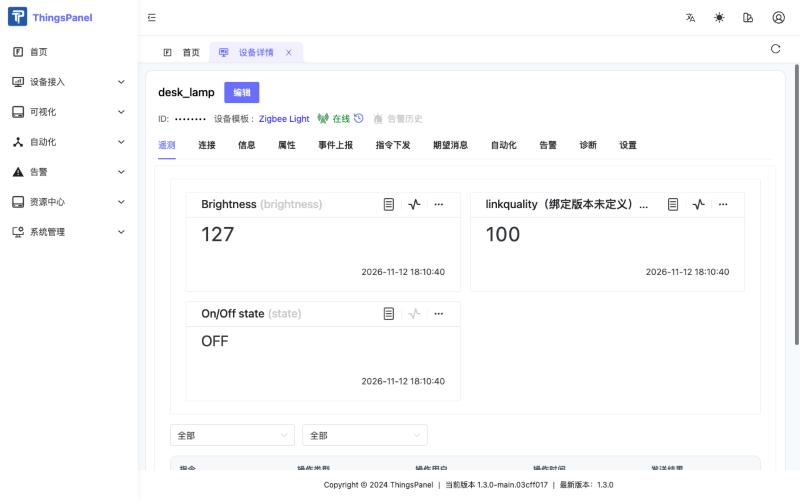
Telemetry keys are Z2M's own property names, flattened one level (color.x becomes color_x); update, update_available and last_seen are dropped; ON/OFF stay strings.
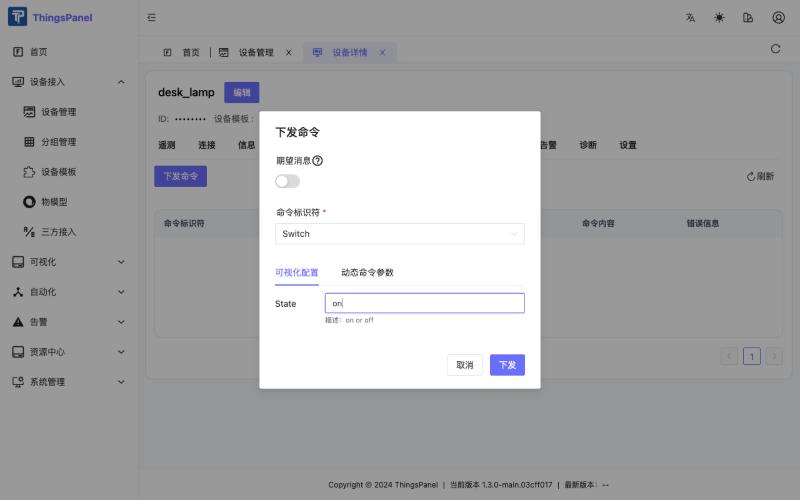
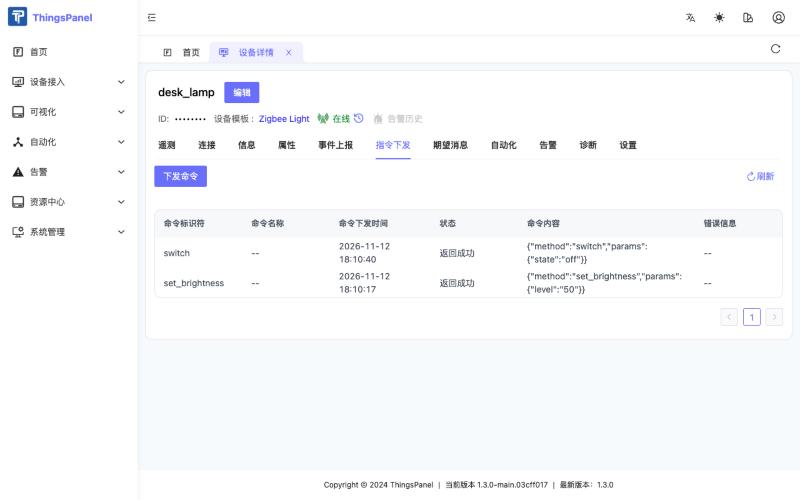
- Open the Command Dispatch (指令下发) tab, click Send Command (下发命令), choose the command and fill in its parameter.
| Command | Parameter value | Sent to Z2M |
|---|---|---|
switch | on, off, true, false, 1, 0 | {"state":"ON"} or {"state":"OFF"} (several switches on one device: use the property name as the command, for example state_l2) |
set_brightness (or brightness) | 1–100 (%) | {"brightness": <0–254>}; 50 % was sent as 127 |
| any writable property the device exposes | value | {"<property>": value} |
A command is shown as 返回成功 (succeeded) only when the device's next state matches what was sent; the connector waits up to 5 seconds. Commands for properties the device does not expose, or that are read-only, fail with a message in the error column.
10. Troubleshooting
- Commands are rejected before sending. The device was bound without a template, the template has no published thing model version bound, or the command identifier equals a telemetry identifier. Fix it as described in section 7.
- A device shows data but never goes offline. Turn on
availability: truein Z2M so that offline devices are reported. - The access point shows no devices. Z2M must be running and publishing
bridge/devices(retained). Check the broker address, credentials and base topic. - A device does not report after binding. Wait up to two minutes and check that the device has sent data since it was bound.
- Renaming a device in Z2M does not affect the binding: bindings use the IEEE address.